> ## Documentation Index
> Fetch the complete documentation index at: https://docs.hiddenlayer.ai/llms.txt
> Use this file to discover all available pages before exploring further.
# Self-Hosted Installation for Embedded Cluster
The HiddenLayer AI Security Platform: Self-Hosted/Air-Gapped can be installed to an embedded cluster.
* The AI Security Platform: Self-Hosted/Air-Gapped can also be deployed on a Bring Your Own Kubernetes cluster using [Helm](/docs/products/selfhosted/selfhosted_platform_helm_install).
## Before You Begin
Before deploying the AI Security Platform: Self-Hosted/Air-Gapped, make sure you understand the [Prerequisites](/docs/products/selfhosted/selfhosted_platform_embedded_prerequisites).
## Prepare the Hosts
Do the following on the controller and on every worker, including the GPU worker.
This section provides guidelines:
* This section provides information gathered from verified installations.
* This section does not provide guidance for every operating system.
* Some information in this section is for specific operating systems. When applicable, those operating systems are identified.
Do not install Kubernetes separately — the installer brings k0s, on paths that do not collide with anything already running.
### Baseline
Run the following command to check that the disk is 200 GB provisioned. The command also checks the kernel and OS. Run this on every node.
```sh theme={null}
cat /etc/os-release | head -2
uname -r
nproc
free -h
df -h /
```
**Example output with highlight**
```text highlight={9} theme={null}
NAME="Red Hat Enterprise Linux"
VERSION="9.8 (Plow)"
5.14.0-687.15.1.el9_8.x86_64
16
total used free shared buff/cache available
Mem: 123Gi 5.4Gi 46Gi 156Mi 73Gi 118Gi
Swap: 0B 0B 0B
Filesystem Size Used Avail Use% Mounted on
/dev/nvme0n1p4 199G 77G 123G 39% /
```
### Hostname
Set a Kubernetes hostname before joining any nodes. Changing the hostname afterward means rebuilding the node. The hostname must be 55 characters or less.
```
hostnamectl hostname
```
Run the following command. It prints nothing on success.
```
hostname
hostname | wc -c
```
**Output**
```
ip-10-2-151-147.ec2.internal
29
```
### Clock
Run the following command.
```
timedatectl
```
Look for the following results and make sure they match the examples below:
* `System clock synchronized: yes`
* `NTP service: active`
**Example output with highlight**
```text highlight={5-6} theme={null}
Local time: Fri 2026-09-11 14:11:05 UTC
Universal time: Fri 2026-09-11 14:11:05 UTC
RTC time: Fri 2026-09-11 14:11:04
Time zone: UTC (UTC, +0000)
System clock synchronized: yes
NTP service: active
```
### Prepare the GPU Node for RHEL
The following commands are for RHEL 9 / Rocky 9. This is to install the driver before joining any nodes.
The following is for specific Linux distributions (as noted) and do not apply to all Linux distributions.
* Do not update the kernel first. The driver install pulls the matching kernel.
* Do not create `/etc/k0s/containerd.d/nri.toml` or `cdi.toml`.
* For Deep Learning AMI, no modifications are required. The driver is pre-baked. Choose the **Base** variant.
```sh theme={null}
dnf install -y dnf-plugins-core
RHELMAJ=$(. /etc/os-release; echo "$VERSION_ID" | cut -d. -f1)
dnf config-manager --add-repo \
https://developer.download.nvidia.com/compute/cuda/repos/rhel$RHELMAJ/x86_64/cuda-rhel$RHELMAJ.repo
dnf clean expire-cache
# a precompiled kmod must exist for THIS kernel — `dnf list` exits 0 and hides it
dnf repoquery --disable-modular-filtering --disablerepo='*' \
--enablerepo="cuda-rhel$RHELMAJ-x86_64" 'kmod-nvidia*' | grep -v dkms \
| grep "$(uname -r | cut -d- -f2 | cut -d. -f4)"
# nothing returned? try nvidia-driver:570 below. never :latest, never -open.
dnf module reset -y nvidia-driver
dnf module enable -y nvidia-driver:580
dnf install -y nvidia-driver nvidia-driver-cuda
```
* Reboot
```sh theme={null}
reboot
```
* Verify
```sh theme={null}
# verify all four — nvidia-smi alone passes without the precompiled module
uname -r && rpm -qa | grep kmod-nvidia && lsmod | grep -c nvidia && nvidia-smi
```
## Install Admin Console
The Admin Console allows you to manage your controller and worker nodes used by the platform. The Admin Console is not the HiddenLayer Console UI (Platform Console).
When the Admin Console is deployed, the following are created:
* Admin Console
* A controller node
Some Admin Console features include:
* Add new nodes
* Edit the platform configuration
* Use the troubleshooting feature to collect logs, resources, and other data to send to HiddenLayer for support
About root:
* Every command runs as root `sudo -i` first, or prefix each command.
* Anything in `` is a value you must supply. Pasting commands as-is, the shell treats it as a redirect.
### Step 1: Download and Extract the Bundle
Download and extract the AI Security Platform bundle to the system where the platform will be deployed.
**For Air-Gapped deployments**
* After downloading, transfer the bundle to the system where the AI Security Platform will be deployed.
* Then extract the bundle and follow the rest of the instructions.
1. Open a terminal and download the bundle.
* Replace `` with your HiddenLayer AI Security Platform License.
```sh theme={null}
curl -f "https://updates.hiddenlayer.ai/embedded/aisec-platform/stable?airgap=true" \
-H "Authorization: " -o aisec-platform-stable.tgz
```
2. Extract the bundle contents.
* The following command yields the `aisec-platform` binary, the `aisec-platform.airgap` bundle, and the `license.yaml`. Neither command needs `sudo`.
```sh theme={null}
tar -xvzf aisec-platform-stable.tgz
```
### Step 2: Install the Admin Console
The Self-Hosted deployment includes an Admin Console that provides commands for adding nodes and cluster status.
1. Install the Self-Hosted Admin Console and follow the on-screen instructions.
* This command runs as root `sudo -i` first, or prefix the command.
```sh theme={null}
./aisec-platform install --license license.yaml --airgap-bundle aisec-platform.airgap
```
2. Set the Admin Console password. This password will be used to login to the Admin Console in the next step.
* After you set the password, an IP address displays; this is for the Admin Console and is used in the next section.
- This password is for the Admin Console login, not the AI Security Platform Console login.
- You will create the AI Security Platform Console login later in this configuration.
3. Navigate to the outputted URL for the Admin Console.
Example URL: `http://10.2.151.147:30000`
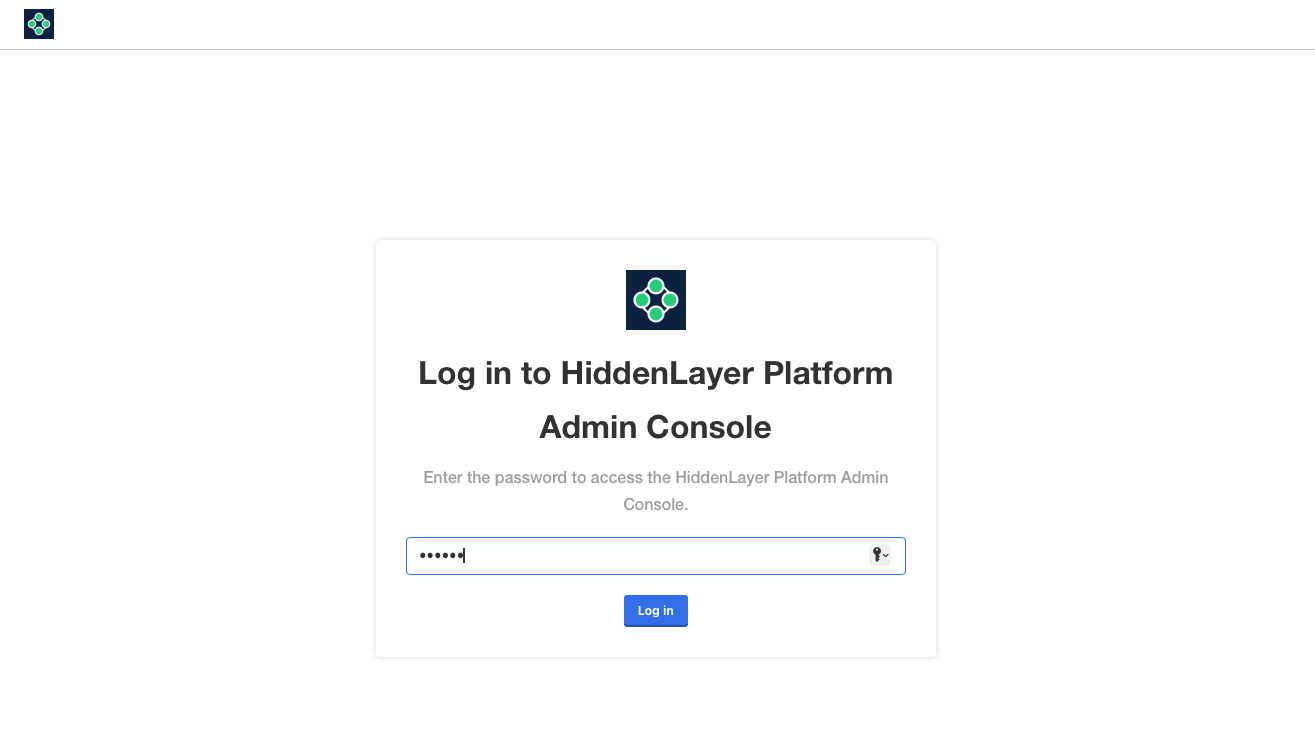
4. Log in to the Admin Console using the password you created.
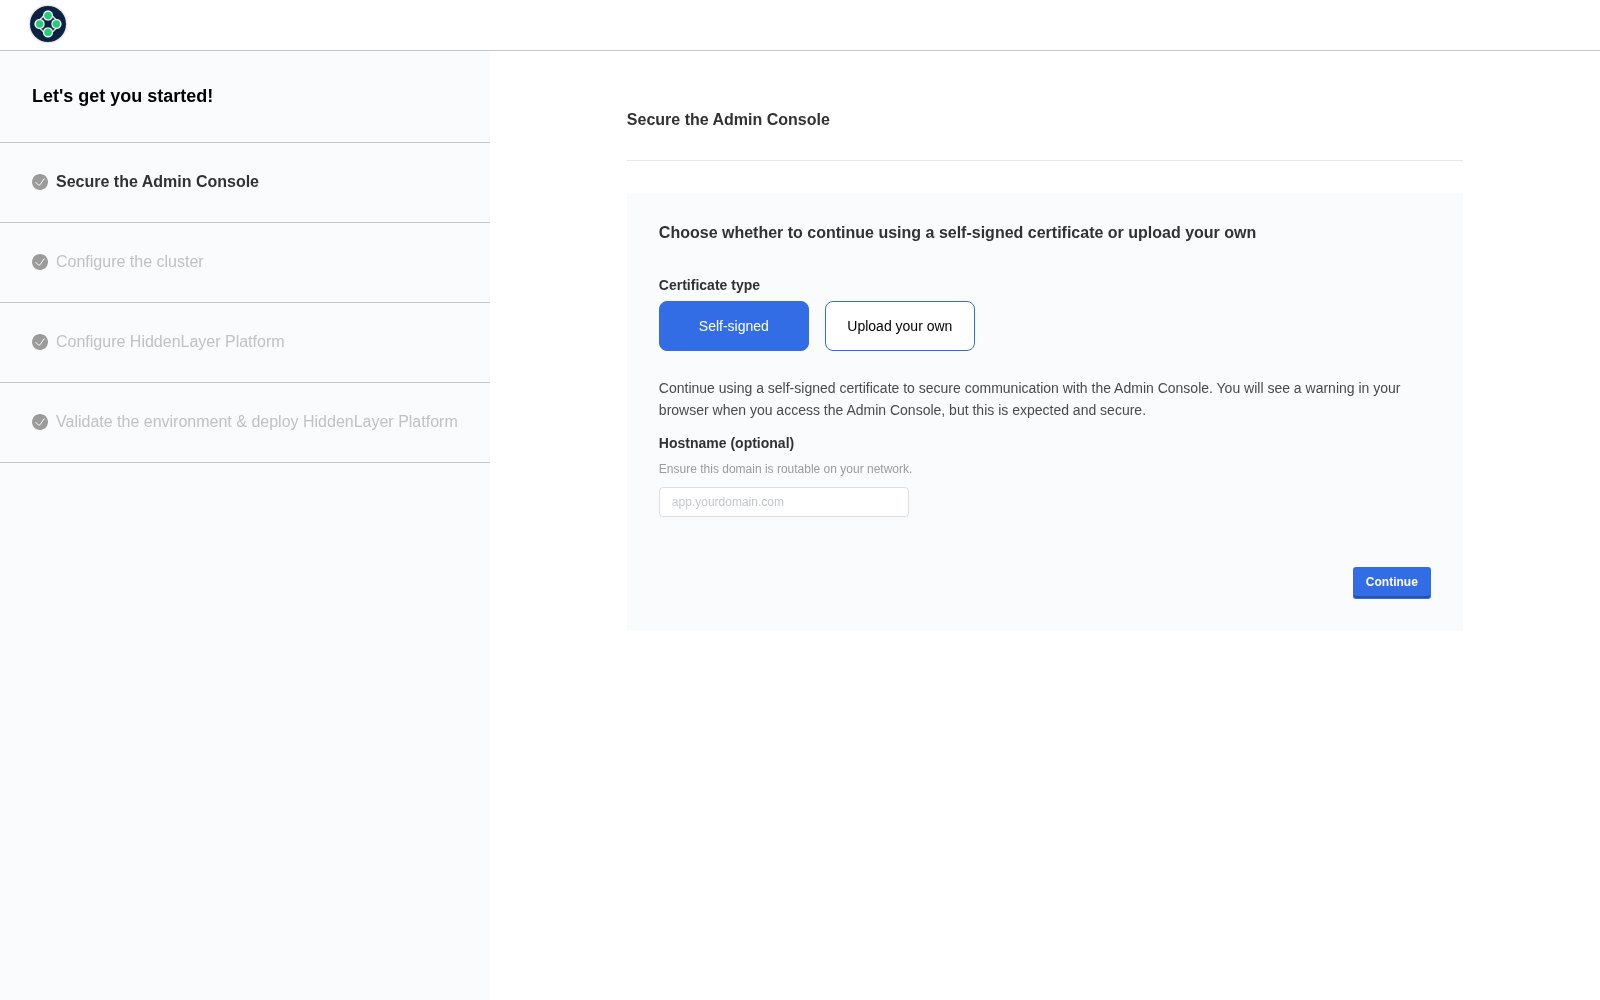
5. Choose what certificate to use, then click **Continue**.
* **Self-signed**: The installer will create a private key and SSL certificate. Can be used for testing.
* **Note**: Using a self-signed certificate may result in a web browser warning message when going to the Admin Console URL. You must select to proceed to the Admin Console. This process will vary by web browser.
* **Upload your own**: You need to upload a private key and an SSL certificate. Recommended for production.
* **Hostname** (optional)
 6. Log in to the Admin Console using the password you created.
 ### Step 3: Configure the Nodes
In this step, you will add all of your nodes to the cluster.
Be aware of the following:
* The initial deployment of the Admin Console includes one controller node. This was done when you deployed the Admin Console in the previous step.
* A GPU worker is required for production environments. A CPU-only option is possible, but not recommended for production environments due to significantly slower performance. Please contact your HiddenLayer representative for more information.
**For RHEL and Rocky, expect an initial failure when joining a node.**
* SELinux is set to Enforcing on this OS. See the steps below for more information and a resolution.
1. Make sure you are logged in to the Admin Console.
2. Add more controller, worker, and GPU worker nodes to meet your organization's requirements.
* Do this before configuring the AI Security Platform (which is the next step).
**Join every node now, not later.**
* The replica count cannot be raised after the first deploy.
* One GPU worker is enough for the default single Runtime Security replica.
* A cluster sized for more GPU workers must have them all present before the configuration form is submitted.
Install only one role on each system.
* A node joined under the wrong role cannot be relabeled. Run `aisec-platform reset` on the node, then join again with the correct role.
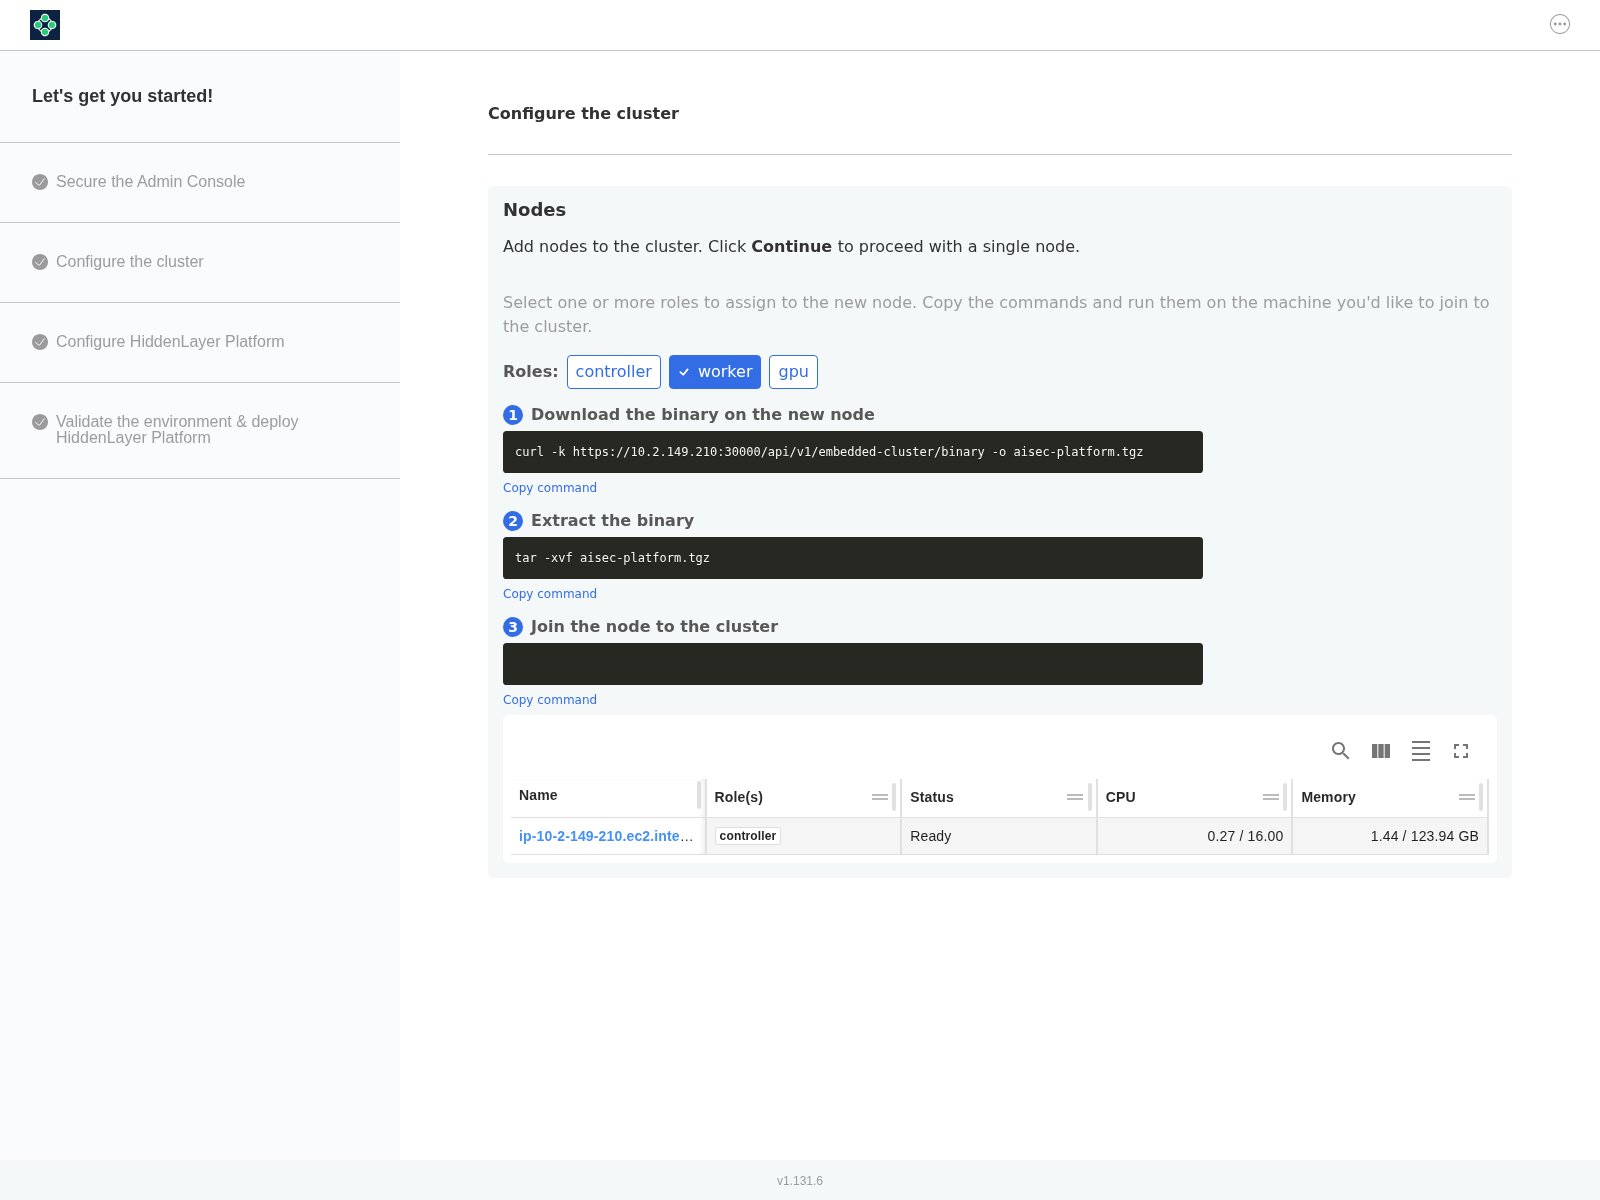
3. To add a controller, select **controller** and deselect all other options.
* Use the commands on the systems to join the controller nodes.
4. To add a worker node, select **worker** and deselect all other options.
* Use the commands on the systems to join the worker nodes.
5. To add a GPU worker node, select **gpu** and deselect all other options.
* Use the commands on the systems to join the GPU worker nodes.
6. As nodes are added, they should appear in the nodes table, under the commands.
### Step 3: Configure the Nodes
In this step, you will add all of your nodes to the cluster.
Be aware of the following:
* The initial deployment of the Admin Console includes one controller node. This was done when you deployed the Admin Console in the previous step.
* A GPU worker is required for production environments. A CPU-only option is possible, but not recommended for production environments due to significantly slower performance. Please contact your HiddenLayer representative for more information.
**For RHEL and Rocky, expect an initial failure when joining a node.**
* SELinux is set to Enforcing on this OS. See the steps below for more information and a resolution.
1. Make sure you are logged in to the Admin Console.
2. Add more controller, worker, and GPU worker nodes to meet your organization's requirements.
* Do this before configuring the AI Security Platform (which is the next step).
**Join every node now, not later.**
* The replica count cannot be raised after the first deploy.
* One GPU worker is enough for the default single Runtime Security replica.
* A cluster sized for more GPU workers must have them all present before the configuration form is submitted.
Install only one role on each system.
* A node joined under the wrong role cannot be relabeled. Run `aisec-platform reset` on the node, then join again with the correct role.
3. To add a controller, select **controller** and deselect all other options.
* Use the commands on the systems to join the controller nodes.
4. To add a worker node, select **worker** and deselect all other options.
* Use the commands on the systems to join the worker nodes.
5. To add a GPU worker node, select **gpu** and deselect all other options.
* Use the commands on the systems to join the GPU worker nodes.
6. As nodes are added, they should appear in the nodes table, under the commands.
 7. **For RHEL and Rocky, expect an initial failure when joining a node.**
* This is because SELinux is set to Enforcing by default on RHEL and Rocky.
* **Note**: The install must fail before running the fix commands.
* The error message looks like the following:
```nocopy theme={null}
sudo ./aisec-platform join :30000
✗ 1 host preflight failed
• The selinux type context label for the embedded cluster binary directory are incorrect.
Try running: sudo semanage fcontext -a -t bin_t "/var/lib/embedded-cluster/bin(/.*)?"
&& sudo restorecon -RvF /var/lib/embedded-cluster
ERROR: unable to run join preflights: host preflight failures detected
```
* The fix is to run the following commands **after** you receive the error.
* These commands run as root `sudo -i` first, or prefix the command.
```
semanage fcontext -a -t bin_t "/var/lib/embedded-cluster/bin(/.*)?"
restorecon -RvF /var/lib/embedded-cluster
```
* Then **join** the node by running the join command supplied in the Admin Console.
7. **For RHEL and Rocky, expect an initial failure when joining a node.**
* This is because SELinux is set to Enforcing by default on RHEL and Rocky.
* **Note**: The install must fail before running the fix commands.
* The error message looks like the following:
```nocopy theme={null}
sudo ./aisec-platform join :30000
✗ 1 host preflight failed
• The selinux type context label for the embedded cluster binary directory are incorrect.
Try running: sudo semanage fcontext -a -t bin_t "/var/lib/embedded-cluster/bin(/.*)?"
&& sudo restorecon -RvF /var/lib/embedded-cluster
ERROR: unable to run join preflights: host preflight failures detected
```
* The fix is to run the following commands **after** you receive the error.
* These commands run as root `sudo -i` first, or prefix the command.
```
semanage fcontext -a -t bin_t "/var/lib/embedded-cluster/bin(/.*)?"
restorecon -RvF /var/lib/embedded-cluster
```
* Then **join** the node by running the join command supplied in the Admin Console.
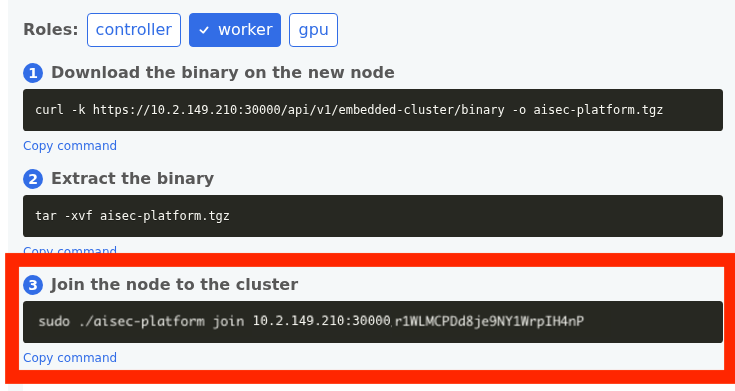 8. You will receive a `Node is ready` message when the node has successfully joined.
9. When you are done adding nodes, click **Continue** in the Admin Console.
### Step 4: Configure the AI Security Platform
Configure the AI Security Platform. The following steps describe each configuration field.
**Notes**
* Some fields appear when a value is entered into the parent field, such as Database Host or OpenSearch URL.
* Leaving the fields blank for Database Host, Kafka Brokers, and OpenSearch URL will cause the installer to enter “Sandbox Mode” and use embedded services.
* Sandbox Mode is for testing and POC purposes only, it is not supported for production environments. Sandbox Mode may not have all features available.
1. Make sure you are logged in to the Admin Console and you are on the Configuration page.
* Enter your configuration and service information in the following steps.
2. Hostname
* This the DNS hostname will be used to login to the Platform Console.
8. You will receive a `Node is ready` message when the node has successfully joined.
9. When you are done adding nodes, click **Continue** in the Admin Console.
### Step 4: Configure the AI Security Platform
Configure the AI Security Platform. The following steps describe each configuration field.
**Notes**
* Some fields appear when a value is entered into the parent field, such as Database Host or OpenSearch URL.
* Leaving the fields blank for Database Host, Kafka Brokers, and OpenSearch URL will cause the installer to enter “Sandbox Mode” and use embedded services.
* Sandbox Mode is for testing and POC purposes only, it is not supported for production environments. Sandbox Mode may not have all features available.
1. Make sure you are logged in to the Admin Console and you are on the Configuration page.
* Enter your configuration and service information in the following steps.
2. Hostname
* This the DNS hostname will be used to login to the Platform Console.
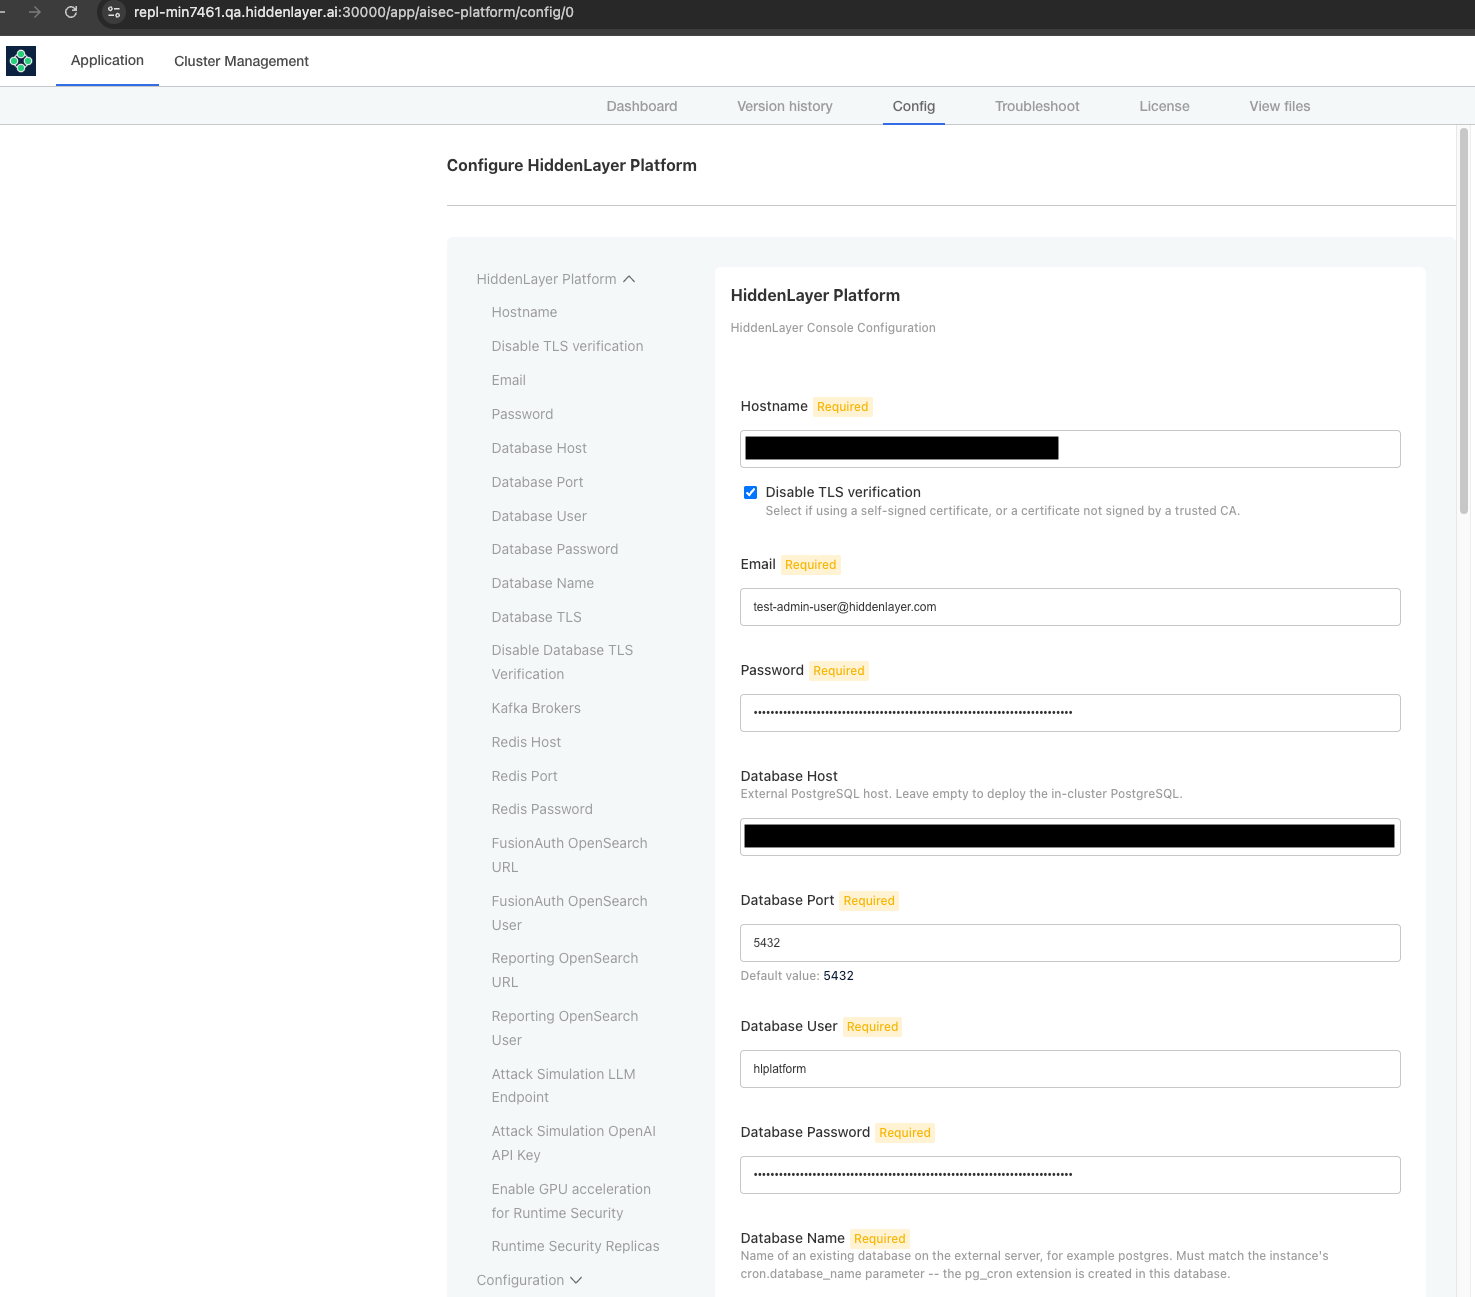 3. Disable TLS verification
* Enable this option if using a self-signed certificate.
* This option should not be enabled if using your own certificate.
4. Email
* This email will be the user name to login to the Platform Console.
* The initial user created is an Administrator for the Platform Console.
5. Password
* This password is for the initial user login.
* The password must be a minimum of 8 characters and a maximum of 256.
6. Database Host
* Example: `your.database.hostname.com`
* When you enter a hostname, other database fields display. Enter the required information.
* Database Port
* Example: `5432`
* Database User
* Database Password
3. Disable TLS verification
* Enable this option if using a self-signed certificate.
* This option should not be enabled if using your own certificate.
4. Email
* This email will be the user name to login to the Platform Console.
* The initial user created is an Administrator for the Platform Console.
5. Password
* This password is for the initial user login.
* The password must be a minimum of 8 characters and a maximum of 256.
6. Database Host
* Example: `your.database.hostname.com`
* When you enter a hostname, other database fields display. Enter the required information.
* Database Port
* Example: `5432`
* Database User
* Database Password
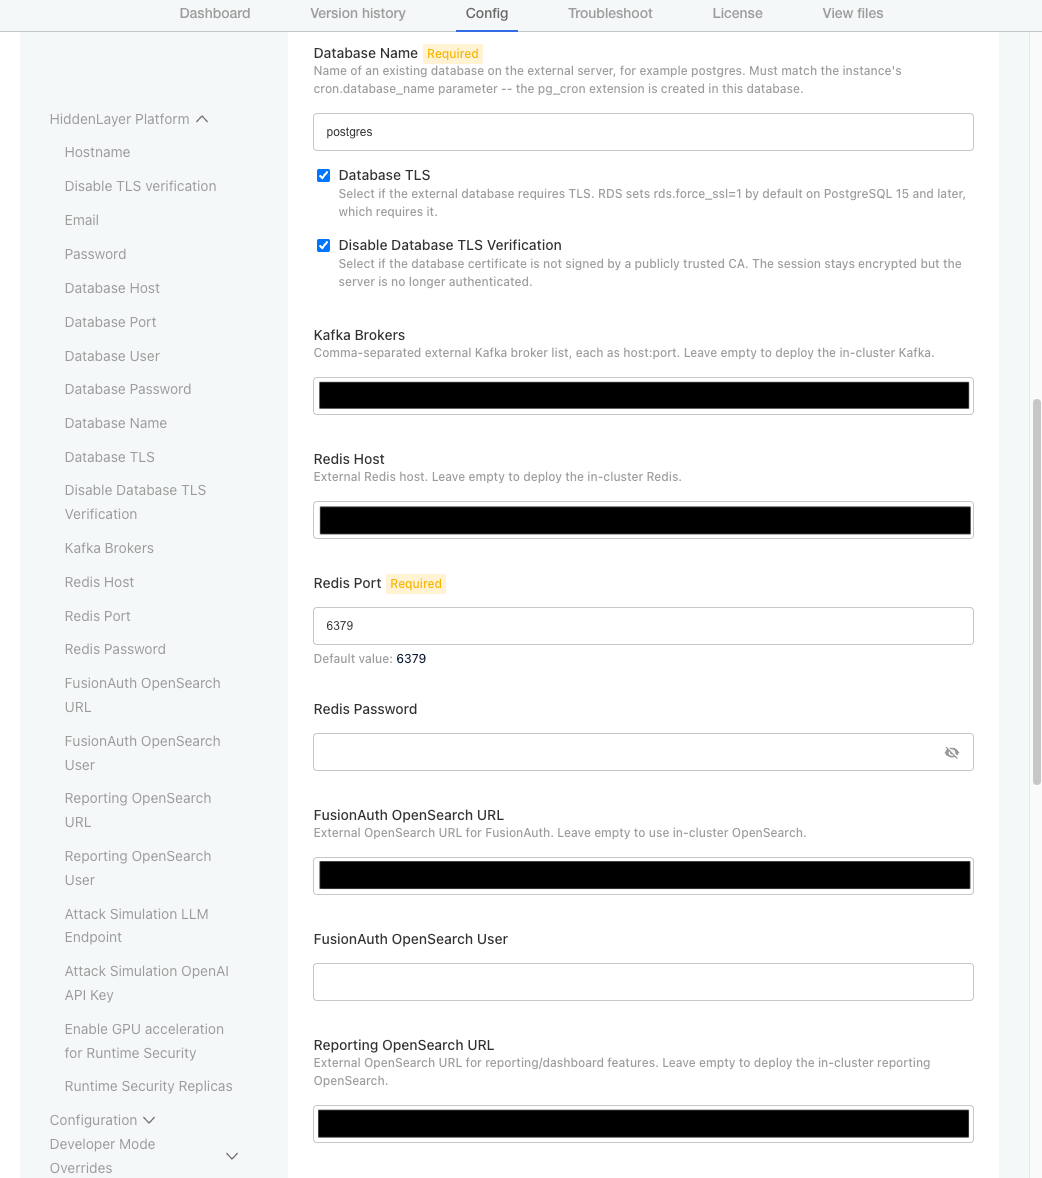 7. Kafka Brokers
* The broker entries can be entered as comma separated values.
* Example:
```
broker-1.your.kafka.domain.com:9092,broker-2.your.kafka.domain.com:9092,broker-3.your.kafka.domain.com:9092
```
8. Redis Host
* Primary endpoint address, port
9. FusionAuth OpenSearch URL
* Example: `https://your.opensearch.hostname.com:443`
* When you enter a URL, other OpenSearch fields display. Enter the required information.
* OpenSearch User
* OpenSearch Password
10. Reporting OpenSearch URL
The **Enable GPU acceleration for Runtime Security** checkbox is selected by default and is intended for production deployments.
7. Kafka Brokers
* The broker entries can be entered as comma separated values.
* Example:
```
broker-1.your.kafka.domain.com:9092,broker-2.your.kafka.domain.com:9092,broker-3.your.kafka.domain.com:9092
```
8. Redis Host
* Primary endpoint address, port
9. FusionAuth OpenSearch URL
* Example: `https://your.opensearch.hostname.com:443`
* When you enter a URL, other OpenSearch fields display. Enter the required information.
* OpenSearch User
* OpenSearch Password
10. Reporting OpenSearch URL
The **Enable GPU acceleration for Runtime Security** checkbox is selected by default and is intended for production deployments.
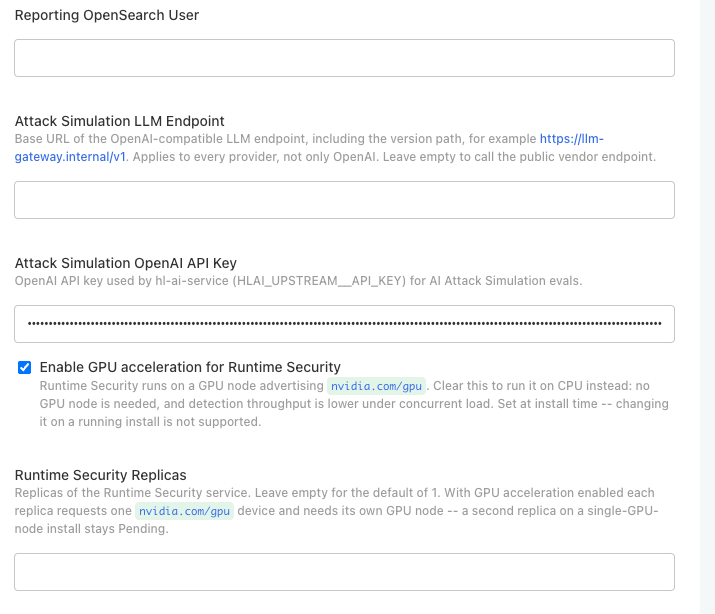 11. Attack Simulation OpenAI API Key
* An OpenAI key, required for Attack Simulation evaluations.
* The evaluation service calls `api.openai.com` directly.
* Leave this blank on an isolated network (air-gapped).
12. Runtime Security GPU Replicas
* Each replica claims a whole GPU device on its own node, so a second replica on a single-GPU install stays `Pending`.
* Defaults to 1.
13. Click **Continue**.
### Step 5: Validate the environment & deploy HiddenLayer Platform
After the initial setup is complete, you will be re-directed to the Admin Console.
* The Self-Hosted AI Security Platform will take time to complete installation after the package is deployed.
* The Platform Console will be accessible when the status changes to “Ready” as seen in the Admin Console.
11. Attack Simulation OpenAI API Key
* An OpenAI key, required for Attack Simulation evaluations.
* The evaluation service calls `api.openai.com` directly.
* Leave this blank on an isolated network (air-gapped).
12. Runtime Security GPU Replicas
* Each replica claims a whole GPU device on its own node, so a second replica on a single-GPU install stays `Pending`.
* Defaults to 1.
13. Click **Continue**.
### Step 5: Validate the environment & deploy HiddenLayer Platform
After the initial setup is complete, you will be re-directed to the Admin Console.
* The Self-Hosted AI Security Platform will take time to complete installation after the package is deployed.
* The Platform Console will be accessible when the status changes to “Ready” as seen in the Admin Console.
